Docker and Node.js: A Love Story with Containers and Code (No Drama, Just Dockerama!)

DevOps Engineer
We are going to containerize the Node Js application using Docker, this is a practical workshop, so open up your favourite editor, install docker and let's get started.
Docker Workshop: Part 1
Node JS Application
Start building a simple Node JS application
- Initialize Application
npm init
- Install Express JS
npm install express
- Simple Express JS app
const express = require("express")

const app = express()

app.get("/", (req, res) => {
    res.send("<p> Full end to end DevOps Project</p>")
})

const port = process.env.PORT || 3000

app.listen(port, () => console.log(`listining on ${port}`))
- Start server
node index.js
- Go to URL 127.0.0.1:3000 Application is running
Containerization
Make a Docker file of our express JS application
touch Dockerfile
# Need a base image of Node JS

FROM node:20-alpine

# Creating the work directory of the application

WORKDIR /app

# First, copy package.json into our current directory " . "
COPY package.json

# Install all packages
RUN npm install

# Copy the rest of the files
COPY . .

Start the server
CMD [ "node", "index.js" ]
- Build the Docker Image
docker build -t my-node-image .
-t: tag flag for giving our image a name
.: it means building the image from Dockerfile which is in our current directory.
Check the list of images
docker images
check your built image name and info.
- Start the container from the image
docker container run -d -p 3000:3000 my-node-image
-d: Detach mode (terminal will be free for other commands)
-p: defining port tunnel to transfer traffic from 3000 port on our PC to 3000 port of node application.
Check the container
docker ps
you'll see running container info with their ID
- Stop the container
docker stop <ID>
Problem
While writing the Dockerfile, we wrote a command COPY . . which copies all files including node_modules that is unnecessary as RUN npm install will install all node_modules.
Solution
.dockerignore, put node_modules, DockerFile, .git and even .dockerignore as we don't need them in production.
So, delete our node_modules directory.
Problem
Each time you make a change in code, you have to re-build the image and re-run the container to see the change, it's a tedious process.
Solution
Using volumes Bind Mount, we can basically sync our directory(Host Directory) with the container directory so we don't have to re-run the whole process just to see the changes.
Volumes persist data between the Host(our laptop) and container or multiple containers.
Run the container with
docker run <absolute path of your current directory>:/app -d -p 4000:3000 my-node-image
Now you can see the changes we made in code directly in the running container or can you :)
Problem
Let's look into whether our directory syncs or not, go into the container
docker exec -it <container name || container ID> sh
ls
cat index.js
So, the code actually did change, so what was the problem, the server didn't restart automatically when changes occurred.
Solution
nodemon, it restarts automatically when you make changes to the code.
npm install nodemon --save-dev
let's rebuild the image and re-run,
Oops, what happened, our container crashed!!!
How did that happen? let's look into the logs
docker logs <container name or ID>
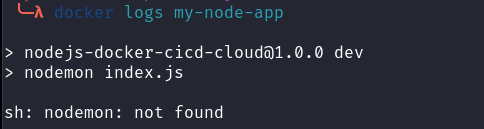
But we did install Nodemon, where did it go?
Problem
When we bind mount our current code directory with the working directory of the container, it syncs the files and as we don't have a node_modules folder and our container has one when it syncs up our container will not have a node_modules folder.
Solution
Anonymous Volume We can override our bind mount volume using this command after our bind mount,
-v /app/node_modules
re-build the container and the container is running successfully, now try to make some changes.
Problem
Go into the container and try to create some files
docker exec -it <container name> sh
touch file.txt
you see, it creates a file in both the container and host(our laptop), as it should, it is working fine as we plan, syncing up our directories.
But, there's a problem, we don't want our container to create files in our production(sometimes we want that, but not in our case), it's a security issue.
Solution
Make the volume read-only, add :ro after bind mount (first delete the container *docker rm -f <contatiner name||id>)
docker run <absolute path of your current directory>:/app:ro -d -p 4000:3000 my-node-image
Check if it is working or not


Environment Variables
Like we have a port env variable, you can run the container using the env variable
- --env
docker run -v /home/harisheoran/DevOps/DevOps-Projects/nodejs-docker-cicd-cloud:/app:ro -v app/node_modules -d --env PORT=4000 -p 5000:4000 --name my-node-app harisheoran/my-node-image
- Using a .env file
--env-file ./.env
Check if it's working


Volume Problem & Solution
Let's check our created volumes,

so, when we kill the container and re-run, these volumes have been created and that's alright as it is the purpose of volumes to persist data even when containers are deleted.
But, in our case, we don't need them,
- Delete all non-working volumes (volume with working container won't be deleted)
docker volume prune
- Delete a single volume
docker volume rm <volume name>
- Delete the volume alongside deleting the container
docker rm <container name> -fv
Docker Compose
We have been using these long commands for a while now, for now, it is fine, it'll become a mess when you are working with multiple containers.
Using Docker Compose we can run, stop, and delete multiple containers easily.
Install Docker Compose
Create a compose file
touch Docker-Compose.yml
In this file, you have to define all the instructions for how you want to build the image and run the container.
version: '3'
services:
  my-node-app:
    build: .
    volumes:
      - ./:/app:ro
      - /app/node_modules
    #environment:
    #  - PORT=3000
    env_file:
      - ./.env
    ports:
      - 5000:4000
version is the version of the compose file.
services where you define all your containers.
my-node-app is the container name.
build location of the Dockerfile from which you want to build the image
volumes as the name suggests
env_file is our .env file location
ports is for host: container ports.
Run the Container
docker-compose up -d
Now check the docker image name and container name, they are created according to our code directory name.
Delete the Container
docker-compose down -v
Amazing thing about Docker Compose
If you re-build the container, the process is so fast from the first one,


So, docker-compose didn't build the image this time, it looked for an image and found it(as it already built the image when we first ran the compose file), it is a feature to make the build process fast.
If you want to re-build the image, then explicitly define it (delete the running container, first)
docker-compose up -d --build
Production v/s Development
Things are different in development and production, we don't need some dev dependency in prod (like nodemon)


and we don't need a bind mount in prod.
How can we solve this issue?
Solution
Create two different compose files, one for prod and one for dev.
OR


- First, create a main docker-compose.yml for the configs shared between both the dev and prod environments.
version: '3'
services:
  my-node-app:
    build: .
    env_file:
      - ./.env
    ports:
      - 5000:4000
- Second, create a production file docker-compose.prod.yml
version: '3'like
services:
  my-node-app:
    command: node index.js
    environment:
      - NODE_ENV=production
- Create a dev file docker-compose.dev.yml
version: '3'
services:
  my-node-app:
    volumes:
      - ./:/app:ro
      - /app/node_modules
    command: npm run dev
    environment:
      - NODE_ENV=development
We override some commands of docker-compose.yml
- Run the container in production
docker-compose -f docker-compose.yml -f docker-compose.prod.yml up -d
The order of compose files does matter, first, put the shared file and then the prod file. -f is a flag for a file.
Similarly, you can run for dev,( remember to remove the container with the down command and rebuild the image --build)
The problem is not solved yet
You can see the nodemon the dev dependency is present in prod.
Why is that? In our Dockerfile we have
RUN npm install
It installs all the dependencies, and in prod, it should be
RUN npm install --only=production
So, how can docker know if we want to run for dev or prod?
Bash Scripting
Using the bash script we can define a simple condition
In Dockerfile
ARG NODE_ENV
RUN if [ $NODE_ENV == prod ]; then \
    npm install --only=production; \
    else npm install; \
    fi
Define an argument variable
Simple condition to check and run the appropriate install command in bash.
So, from where do we pass the NODE_ENV value?
the answer is from docker-compose.dev/prod.yml files
In docker-compose.prod.yml
Override the build command,
context: is the location of Dockerfile
arg: is for the argument
version: '3'
services:
  my-node-app:
    build:
      context: .
      args:
        - NODE_ENV=prod
    command: node index.js
    environment:
      - NODE_ENV=production
In docker-compose.dev.yml
version: '3'
services:
  my-node-app:
    build:
      context: .
      args:
        - NODE_ENV=dev
    volumes:
      - ./:/app:ro
      - /app/node_modules
    command: npm run dev
    environment:
      - NODE_ENV=development
Now, re-run the dev and prod container, and use --build to rebuild the containers. and check the prod, and you see the demon dependency is gone.
Source Code
That's it for part 1, see you in part 2. Leave a comment, if you are stuck along the way.


